

YOU GUYS! I built this closet built-in! It may not be perfect, but I did it.It’s so good -and it only cost me around $400! Now I’m ready to put a closet built-in in alllll of my closets!

I really wanted some sort of storage system in here, and considered going the Ikea pax route. COVID-19 limited me there and honestly, I’m thankful! I’m sure that putting together a closet built-in system with instructions would have been easier. But I have now upgraded from beginner to intermediate builder and I am feeling proud as HELL (so, worth it).

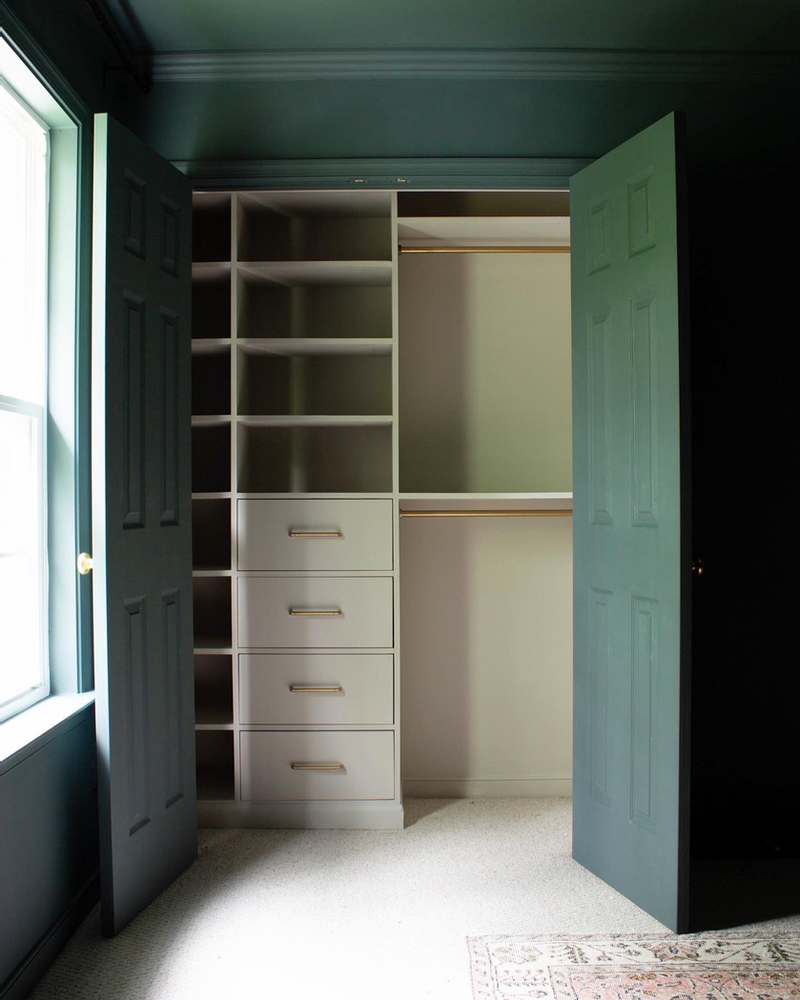
I began by measuring out the closet and making some sketches for the closet built-in. The width of the closet didn’t allow for much. I knew that I wanted there to be some drawers and double hanging rods. This is the layout that I landed on! There were other options, but I really like the idea of optimizing the side nook for shoe storage (drawers wouldn’t have been able to go there).
After coming up with my rough draft sketch, I was able to come up with hard measurements. I took the width of the entire closet and subtracted the width of the ,,3/4 inch plywood pieces to divide that up and come up with my dimensions. Adult shoe sizes and baskets were taken into consideration here. I didn’t want Rainie’s shoes to outgrow this thing! Or to be stuck without cute baskets that could fit!

My dimensions were set. Now it was time to gather the supplies for my closet built-in.
–,,3/4 inch sanded plywood (2 sheets)
–,,1/2 inch sanded plywood (2 sheets)
–,,construction screws (2.5 inch and 1.25 inch)
–,,pocket hole screws (1 1/2 in)
–,,foam board (only needed if you are ripping down your plywood at home)
–,,skil saw/circular saw OR ,,table saw
–,,clamps (at least two)
–,,2×4′s for box base
–,,flanges

I made the mistake of bringing home my plywood without having Home Depot cut them down to the widths I needed (I have them cut down to fit in my car), so I was left having to make long cuts with my circular saw. This worked, but gave me some janky cuts (mostly because I only had one clamp). I would recommend having your measurements READY and asking your hardware store to cut them down for you! Both Lowe’s and Home Depot will do this. Plus, it makes it soooo much easier to transport the wood AND to build this thing!

SHELVES
Since I did not have my plywood cut down to size, I now needed to do that at home. I did this multiple ways, but the most successful was with my Dad’s track saw and/or with a wood guide. Most people do not have a track saw, but it’s basically a plunging circular saw with a built in guide. If you don’t have a track saw, I would recommend using a guide with your circular/skil saw.
**I tried using the ,,Kreg Rip Cut attachment on my saw. While I think that it is a great concept, I did not have luck using it. I ended up having to buy more wood and/or fix all of my cuts because if the inaccuracy.
Here is how you would use a saw guide:
Find a straight edge
Make multiple cut marks down your piece of plywood and draw a line (the line isn’t necessary but it is helpful)
Take a measurement from the outside of your saw fence to the inside of your blade
Add that measurement to your cut width and mark down your plywood
Line up your guide with those marks (the new ones, not the cut line)
Clamp the straight edge down on each end
Run your saw alongside on your guide
IMPORTANT – I can’t express how much easier this is if you have a support under your wood. It keeps your cutting piece from falling as you near the end of your cut. this can cause splintering and and uneven cut. Place a scrap piece of wood or foam under your cutting wood and raise up your blade depth so that it just surpasses your cutting wood. This supports your cutting piece as you go and ultimately makes this whole process 100 times easier!

Here were my long cuts for the box/shelves:
1/2 inch plywood
32.5 inches (back)
3/4 inch plywood
14 1/2 inches x 6 (box divider / sides / shelves / top and bottom)
All of these cuts were made from 2 sheets of 3/4 inch plywood and 1 of the sheets of 1/2 inch plywood (the remainder was used for my drawer boxes)

Okay! My long cuts are done for now. Now it’s time to start cutting the pieces to length.
92 in (x2) – two sides and back of box
90 1/2 in – box divider
31 in (x2) – top and bottom of box
9 1/8 in (x9) – shoe shelves
20 1/8 in (x9) – shelves
30 1/2 in (x2) – rail shelves
The next step was to build a box support on the floor for the box to stand level. This is optional. You could also remove baseboards/carpet. I chose to do this option because I wanted a chunky bottom trim on mine.


I did this by using 2x4s and my miter saw to cut pieces and screw them into the floor the same width and depth of my box (minus 1/2 and inch on each side to account for the baseboards)** My base was a little too small. I’d recommend making it the size of your box if you plan on finishing it off with moulding.
The base provided a level standing ground for my box to be installed. I started by placing two of my pieces and screwing them into the baseboards (making sure they were level), and then adding each piece by screwing into the floor/baseboards/other pieces.
Once this was done, I put my box together. First, I marked where my divider would go and drew a line down the back piece to line up that piece later on. I did this in Rainie’s room so that I didn’t have to carry the entire box upstairs. Then, I used my Kreg Pocket Hole Jig to make pocket holes along the side pieces and divider ( about 6 holes per piece). Then, I used a square and my foot to hold each side piece onto the back and screw it in (. I’d slide the square down with my foot as a block on the opposite side for pressure. This helped keep the two pieces perfectly square. I repeated this step for the other side.


I whipped out my fancy corner clamp for the next step. I made three pocket holes on the top and bottom pieces, and then used the clamp to hold each corner into position while screwing them onto the box. Then, I lined up my divider with my marked line, and screwed into my pocket holes while also using the square and my foot. And my box was ready to be installed!


I placed the box onto my base in the closet and screwed it into the base and the wall to secure it (2 1/2 in construction screws). Once it was secure I then began measuring for my shelving placement. I knew that I wanted about 9 shelves that ran symmetrically across both side of the unit. I took the entire height of the inside of the box (90 1/2 in) and subtracted the width of 9, 3/4 in shelves (6 3/4) and then divided that number by 9. This told me that my shelves need to be 9 1/3 inches apart.

The shelves needed pocket holes drilled into them for installation. I did one hole on the sides and back of each of the small shelves, and double holes on the sides and backs of the others.
David then cut a scrap piece of wood down to 9 1/3 inches to use as a spacer for installing the shelves! We could then stand up the space in the back of the box and set the shelves onto it and screw in. Then repeated that step for each side.

DRAWERS
Now that the shelves were installed, I began making my drawer boxes! Drawer slides typically require 1/2 an inch of clearance on each side of a drawer box. I sketched out my plans based off of this and my drawer holes.

I wanted my boxes to be 13 in long (long enough for my 12 in drawer slides). My drawer box dimensions ended up being 19 1/8 inches wide (1 inch smaller than the opening), 13 inches long, and 7 inches tall.
Here are the cuts I made for my four drawers:
1/2 inch plywood
19 1/8 x 7 (x8) – front and back
12 x 7 (x8) – sides
19 1/8 x 13 (x4) – drawer bottoms
3/4 inch plywood
19 7/8 x 9 – drawer faces
I used a ,,table saw to make these cuts. If you want super accurate cuts, this is the way to go. If you don’t have a table saw, you can also make these cuts with a circular saw and a guide! A miter saw can also work for some smaller cuts, as long as your blade is large enough.
After my cuts were made, I used my handy corner clamp again to build the boxes. I used 1 1/4 inch construction screws for this, making sure to screw straight. They worked really well for this! After screwing the box together, I attached the bottom with additional screws.


Now it was time for drawer slides! I bought these bottom mount slides. They weren’t the nicest ones. But they seems really easy to install and were super cheap. I used another scrap piece of wood as spacer for these and it was so helpful. I started by measuring and marking the same amount from the box face on all sides where the slides would be installed (1/2 inch). I then rested the slide onto the spacer and lined it up with my mark to screw it in!

There is a Kreg jig for this. And apparently it’s great. And I wish that I would have gotten it. But, I still got it figured out! I then had to figure out how far back on the drawer boxes to screw in. I did this by just holding the slide to the bottom of a box and “dry fitting” it into the hole and onto the slides. I wanted my drawer faces to be flush with the box/trim, so I adjusted until the drawer box was about 1/4 inch past the box face (this would allow for my drawer front and finishing trim depth). Once I had it in place, I measured and made marks at that same measurement on all four of my boxes, and screwed in my slides!

I then attached the drawer fronts. This was a little complicated. I’m sure that there are many ways to do this, but I’ll share the way that I did it. I measured the distance from the inside edges of the shelf box (top and side) to the drawer box edges and subtracted 1/8 inch from each. I then marked those measurements onto the back of my drawer faces. I removed the boxes from the slides and placed them onto the backs of the drawer faces and lined them up with my marks, being SUPERRRR accurate is very important here. And then I screwed in! My screws were just barely too long for this, so I had to be cautious of them puncturing through.
TRIM
I decided to add in some finishing trim to all of the exposed edges to make it seamless. I purchased this 1/2 in x 3/4 in ,,pine moulding that was perfect! It was the same exact width of the plywood, so it made the installation super simple. I measured and cut the longest pieces first, and then moved on to the small pieces. I was able to nail most in with my brad nailer and 2 inch finishing nails. My nail gun was not able to reach in the corners and top part of the closet built-in, so I have to secure those pieces with ,,Loctite.

Now that the entire closet built-in was BUILT, I filled in nail holes and cracks with ,,wood filler. I also caulked along the inside shelf edges to remove all of the seams that I could before painting. After the wood filler dried, I gave everything a good sand down with my sanding block. I also lightly sanded all of the sharp trim edges on the shelves. After sanding, I wiped it all down with a damp cloth.
I decided to add in some moulding along the top and bottom of it take it to the next level. I used this ,,baseboard moulding along the bottom, and this ,,cap moulding around the top to finish it all off! I used my miter saw to cut the meeting ends at 45 degree and angles and secured them to my box base with my brad nailer.

Next, I prepped the railing for clothes. I used this ,,conduit from Home Depot. It was only $5 for a 10 ft piece (this is cheaper than purchasing actual closet railing). I cut it down to width with this little ,,pipe cutter, and marked it about 2 inches down from both of my shelves with ,,floor flanges (home depot). I sprayed the rods and flanges with this ,,paint to make them brass, and then sprayed with a ,,clear enamel. I let them completely dry before installing!

I then marked for my ,,drawer pulls and drilled through with a drill bit the same size as my bolts that came with my pulls. I measured from top to bottom of the drawer face and marked halfway, and repeated again to make a straight line. I then found halfway from the sides and marked. Then, I took the width of the pulls and divided that in half and marked that from the center line. I then used a drill bit slightly smaller than my bolts to drill straight into the drawer face!
Once I had my marks ready, I made sure to give everything a good wipe down to prep for painting. I used a small microfiber roller and 1.5 in angled paint brush to cut in. I chose accessible Beige by Sherwin Williams in flat. I painted everything in the closet built-in, including ceiling walls and trim!
Once everything was painted, I installed my drawer pulls and closet rods (I had to use my previous rod measurements to mark out on the wall and box). On the wall side, I made sure to use wall anchors for my screws for extra strength (there was not stud behind where I wanted the rod placed). I screwed in the flange onto the wall side. I placed the rail into the other flange, and then put the opposite end into the mounted flange at and angle and slide the unmounted flange over to my mark and screw it right in! I had to use short screws to make that it would not come out of the other side.
I LOVE how this turned out. I want to put a closet built-in in all my closets now!
TOTAL DIY CLOSET BUILT-IN COST : $331
*this did not include the items that I already had on hand
Go ,,here to see what every one else is up to for Week 2 of the One Room Challenge!
Here’s everything I used for this DIY Closet Built-In!


Hi!! This was an awesome build and inspired me to do the same for my daughters closet. Quick question – why add 1/2 inch plywood for the back? Why not leave it with drywall and anchor the box from top and bottom? Thanks in advance!
Yay!It would have been fine to do that instead! I did this so that there were no gaps between the shelving and the drywall. But caulk could fill that if so!
Thanks so much! Another question did you prime the wood before you painted and what primer did you use if so?
You did a wonderful job! I have done quite a bit of carpentry over the years. It is satisfying and fun but work. Congratulations it’s beautiful.