


Here is the Ikea dresser I started with.


After bringing it home, I quickly put it together to figure out the measurements for my Built-In Ikea Bookcase Desk. I skipped putting on the back and top of it because i knew that this would not be necessary. I knew that I would be cutting down the legs on the chest to make it more ideal for desk height (typically around 30 inches). I ended up cutting the legs completely flush using my jig saw after it was assembled. This step could have been executed better by using my miter saw prior to assembling the chest. My legs were cut down to 32 inches, making the total height of the chest 32 inches as well.


I also picked up my lumber for the remainder of this. I grabbed two sheets of 3/4 sanded plywood from Home Depot and had them cut down in the store for me. Here are the cuts that I had done:
Sheet of Plywood #1 – 37 1/4 x 61 in (back of bookcase)
Sheet of Plywood #2 – 19 x 80 in (desk top) and 19 x 32 in (desk side)
**There are certainly cheaper ways to do this, but this was the fastest way that I could think of to build this thing.
In addition, I also picked up five 6 ft select pine boards (10 in. wide). And five 8 ft select pine 1×2’s. The only different between standard pine and select/premium pine aside from the cost, is the surface texture. Select/premium pine is much smoother and require less sanding/filling which was ideal for my strict time frame.
**I originally purchased 12 in wide pine boards and had to cut them down to make my bookcase more shallow so that it would not run into my air return vent in my ceiling. I think that the more shallow shelves look even better, so I adjusted my details above to measure the same as mine!

I then began removing my baseboard trim in the area that I planned to build. I did this by cutting the caulk line with a razor blade. The using my painters tool and a hammer to pry each piece away from the wall. I used pliers to remove the existing nails and set the trim aside for later.
I placed the Ikea Chest in the spot where I wanted it and screwed it into the studs in the wall behind it. This helped to secure it. After it was secure I placed my desk top piece onto the chest and made sure that it was flush against the wall on both sides. I clamped it down to the chest while I screwed it in to the top of it with about six screws.

I then added four pocket holes to the end of my desk side piece so that I could attach it to the desk top. Once this was done, I placed it under the desk top and used my Kreg 90 Degree Corner Clamp to hold it tight while I screwed it together with my Pocket Hole Screws. I applied some Loctite Power Grab Adhesive to the backside of the desk side piece because there was no way to secure it to the wall (no stud there). Pocket holes/screws would have been ideal if there was a stud where my desk side met the wall.

I also screwed in two corner braces at the desk top/side joint for extra stability. In addition, I used two more corner braces to help secure the desk top to the wall. I paced them where there were studs and screwed in. I think that using a piece of 1×2 pine with screws into the studs as a ledger would have been better instead of the corner braces here.

I then began prepping my bookcase box by adding 5 pocket holes along each side (on the back) and 4 along the bottom (on the front). I used my pocket holes to screw in two pieces of pine that I cut down to 61 inches on my miter saw. I was then able to place the “box” onto my desk top and screw it in (making sure that it was flush with the walls.


The next step was to install ledgers for my shelves. I cut down my 1×2’s with my miter saw. Four 29 in pieces and either 6 in pieces. After cutting these down to size, I adjusted my miter saw to 45 degrees and cut my 6 inch pieces at an angle on the ends. This was not necessary, but it did help to make the ledgers a little more disguised.
I additionally cut down two pieces of 1×2 to 11 inches to used as templates for installing my ledgers. This makes the process go so much faster! I found this measurement by subtracting 6 inches (the combined width of all four shelves) from 61 inches (the total height of the bookshelf) and diving it by 5 (total sections between bottom and top of bookcase).
I began by placing each 11 inch template on each side of the book case and placed my first ledger on top of them flush. I nailed it in with my brad nailer (using 1.25 in nails), and repeated all the way up the bookcase. I placed both wood templates side by side and repeated this step with the side ledgers along each side of the bookcase.

Next, I was ready to cut down my shelves to length. But first, I had to cut some width off of them so that they would be flush with the front of my bookcase. The plywood on the back of the bookcase box was 3/4 in thick, so I only needed to cut 3/4 of an inch off of my shelves. Using my circular saw and a straight edge clamped down (can also be done with a table saw or even potentially done at Home Depot/Lowes when purchasing wood) I cut 3/4 in off two of my 10 in planks (the third plank did not need to be cut down). I then cut four shelves from these pieces at 37 1/4 inches. Once this was done, I installed each shelf and used my brad nailer to secure each one to the ledgers.
Once the shelves were installed, I cut my remaining 10 in plank down to the width of the bookcase. I secured it to the top using wood glue, and let it dry completely. After it was dry, the 1×2 trim was ready to be installed. Here is my 1×2 cut list:
80 in – desk top (cut at 45 degrees)
32 in – desk side (cut at 45 degrees)
61 in (x 2) – bookcase sides
36 in (x 5) – shelves & top
I nailed each piece in with my brad nailer.


Next, I prepared to install my moulding. I measured where my existing baseboard would be replaced. Making sure to note how my angles would be cut. I did the same for the new moulding along the top and bottom of the built in. For the bottom I used a small stop moulding, and for the top I used a smaller general purpose casing. I cut each piece and nailed them in with my brad nailer. After this was complete, I filled every hole with joint compound (can also be done with wood filler/wood putty) and caulked all of my cracks (between wood joints/shelves) on the inside and outside of the built in. After it was completely dry, I sanded it all down using my mouse sander with 120 grit paper.


It was then time for paint! After wiping everything down, I began taping off where I wanted to paint. My plan was to use a paint sprayer to save some time. After placing Frog Tape around my edges, I went back and used some Scotch Blue Tape + Plastic around the ceiling and floors to protect from overspray. I then filled my paint sprayer up with HGTV Showcase (Anew Gray by Sherwin Williams in Satin). The wood areas really could have used a primer coat prior to spraying. I had to give everything a second coat. I ended up also using a roller after spraying to smooth it all out with my second coat.


AND DONE!

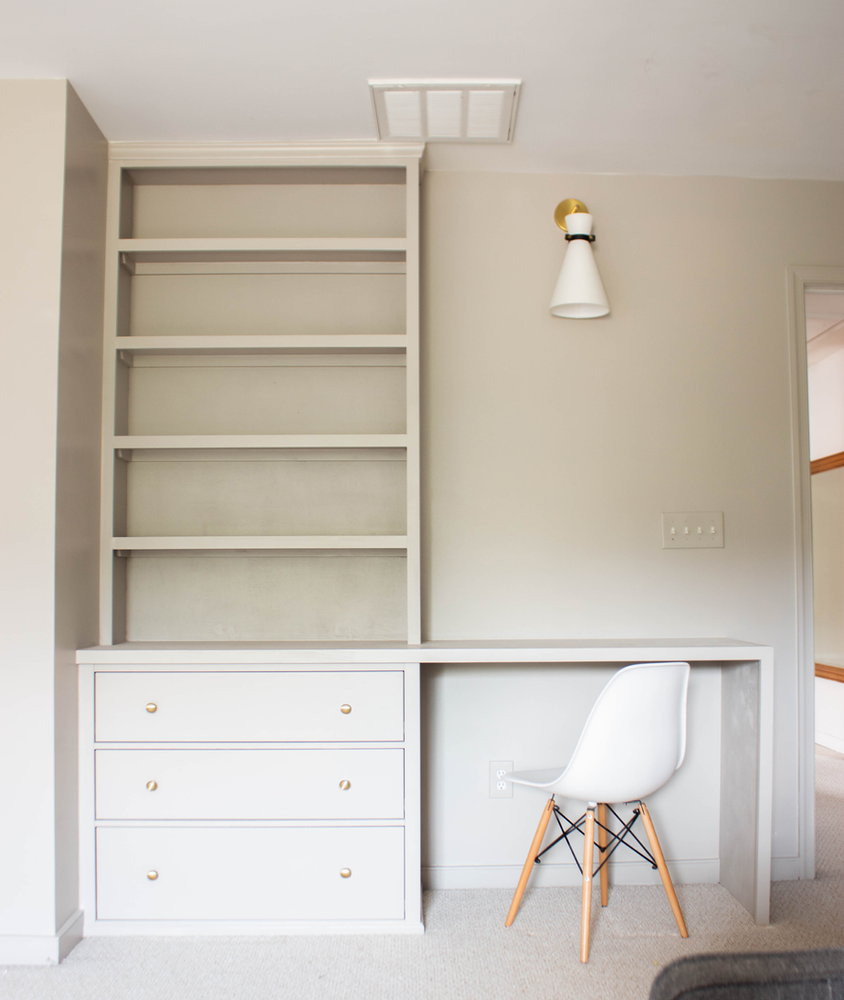
All in all, this Built-In Ikea Bookcase Desk cost me right around $400 including the Ikea chest. I think that it could have potentially been done with different wood to save some money. Maybe even joining together two of the 10 in pine planks for the desk top/side using pocket holes and filling/sanding the crack? I’d love to hear your results if you try another method!
Here’s everything I used for this DIY Built-in Ikea Bookcase Desk!


It looks amazing! Did your paint stick to the ikea dresser well or did you have to use a primer? I’ve had issues in the past with paint not sticking well to ikea pieces.
I used the Hemnes chest that was ‘white stain’ and it had no issues with adhesion! It’s much more porous than the slippery painted options. But a good primer could also work well!
Hello – I love the idea of this DIY! I’ve been having a hard time finding the perfect desk I want for my home office remodel and this totally fits the bill. I’m new to doing DIY by myself (without the help of my dads tools) and don’t have any type of saw. I plan to do just the chest and desk top without the bookshelf. Are you able to provide a list of what tools or saws I’ll need? Thank you again for this amazing idea!
Hi! Could you give some more details on the pocket holes? Did you use a kreg jig?
Halp
That turned out amazing! I love it with the gold knobs!
Thank you so much!
My goodness you are amazing! It looks so good.
Thank you so much!!!
Cass, your a star, brilliant idea and execution! I love love love that you note the pieces or processes that you could/would do differently next time – such grace!
Do you mind divulging a rough estimate of the time you spent on the build once you had purchased the drawers and lumber? I ask because I am entirely useless at figuring out how long something will take to build, thinking I can get everything done in a day and running out of time and stressing…
Thank you so much!
For this build, I spent about a week altogether (about 4 hours each day) from start to finish. That was in between mom duties as well, so it was pretty quick! Installing the drawers saved a lot of time!
This is amazing! How did you attach the ledgers onto the shelf that would be exposed, not against the wall?
And are brad nails enough for support? looking to building a bookshelf and this looks like a great tutorial!
Is the desk too high for a standard desk chair? I’ve seen from another hack that 32 inches can be really high for a desk… normally desks are about 29/30. Did you have to buy a super tall chair?
did I see that you also changed out the floor? If so, can you tell me what material and what color? Looks great!
Hi! Love this look. I’m
Not handy so I’m going to have my trim guy do this. But question— with the hemnes dresser are you able to use a drawer for files?
Thanks 🙂
What handles did you use? Or did you spray paint them gold?